Build J2EE micro services architecture by using Spring Boot, Spring Cloud, Spring Security OAuth2, KeyCloak
I posted an article in regards to single page application(UI), but in this post I'm going to introduce how to build micro service architecture for J2EE application with Spring framework and open source SSO framework Keycloak. This post will cover the following aspects:
- Keycloak setup
- Eureka service registration and discovery
- Spring Cloud API gateway
- Spring Security (OAuth2 login) and the integration with Keycloak
- Micro services
The code is available in my Github and please check the docker-compose.yml at first so that you can read the rest of the post easier. One thing I need to mention here is you need to replace the ip address of keycloak server url with your own before running the docker containers.
Then, you can run the following cmd to start up docker containers.
1.Keycloak
1.1 Create a realm
Login http://localhost:18080/ with admin/admin, then create a realm as below, leaving all the fields as default.

1.2 Create clients under the above realm.
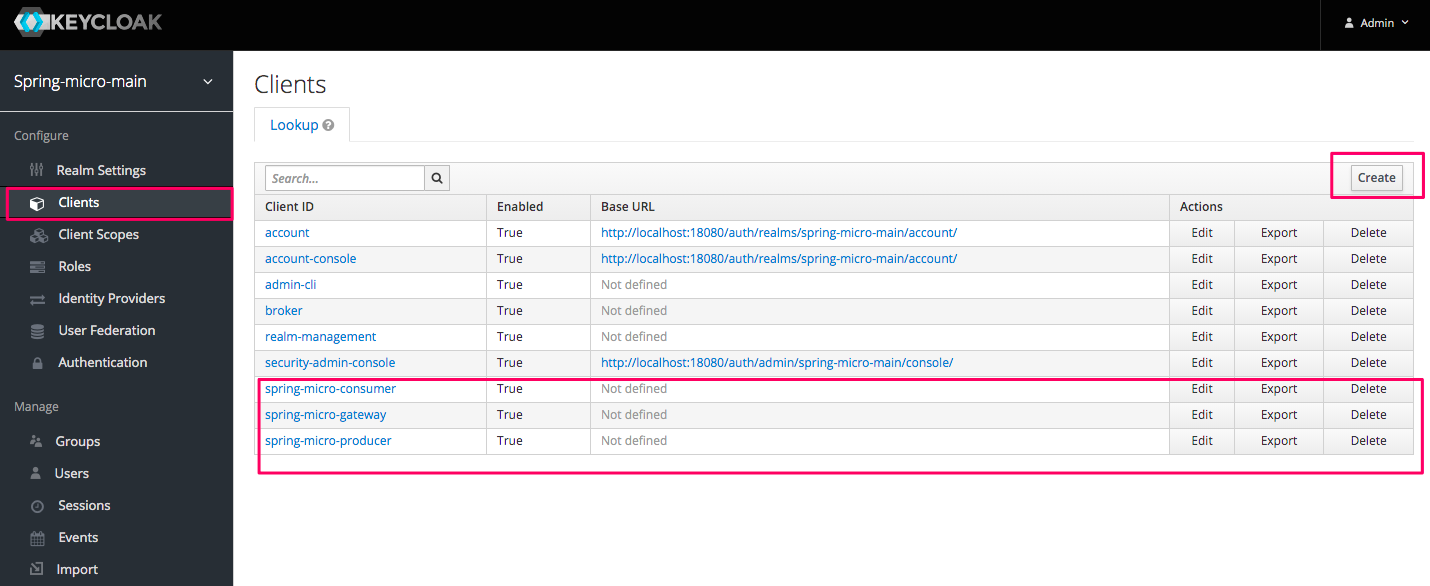
As shown above, we created three clients which represent api-gateway, micro service consumer, micro service producer. There are two things necessary to mention.
First, fill mandatory field(Valid Redirect URIs) as * so that we can redirect back to our URI configured in our application.
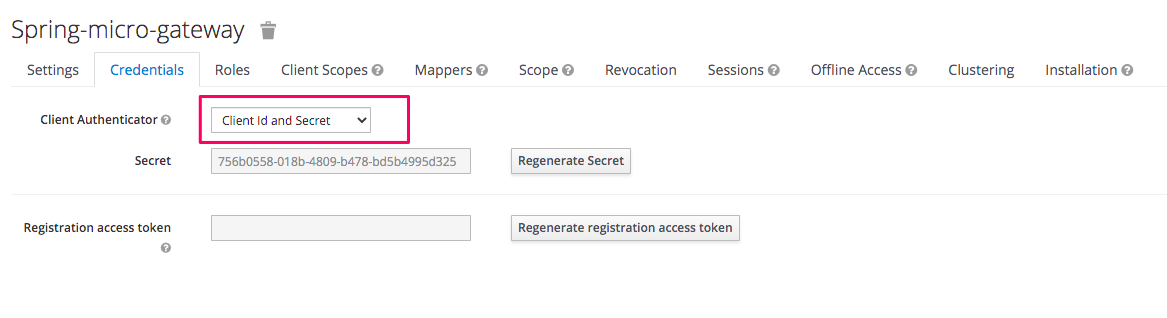
Then, choose client id and secrete as Client Authenticator, which is suitable for the integration with Spring Security OAuth2 client.
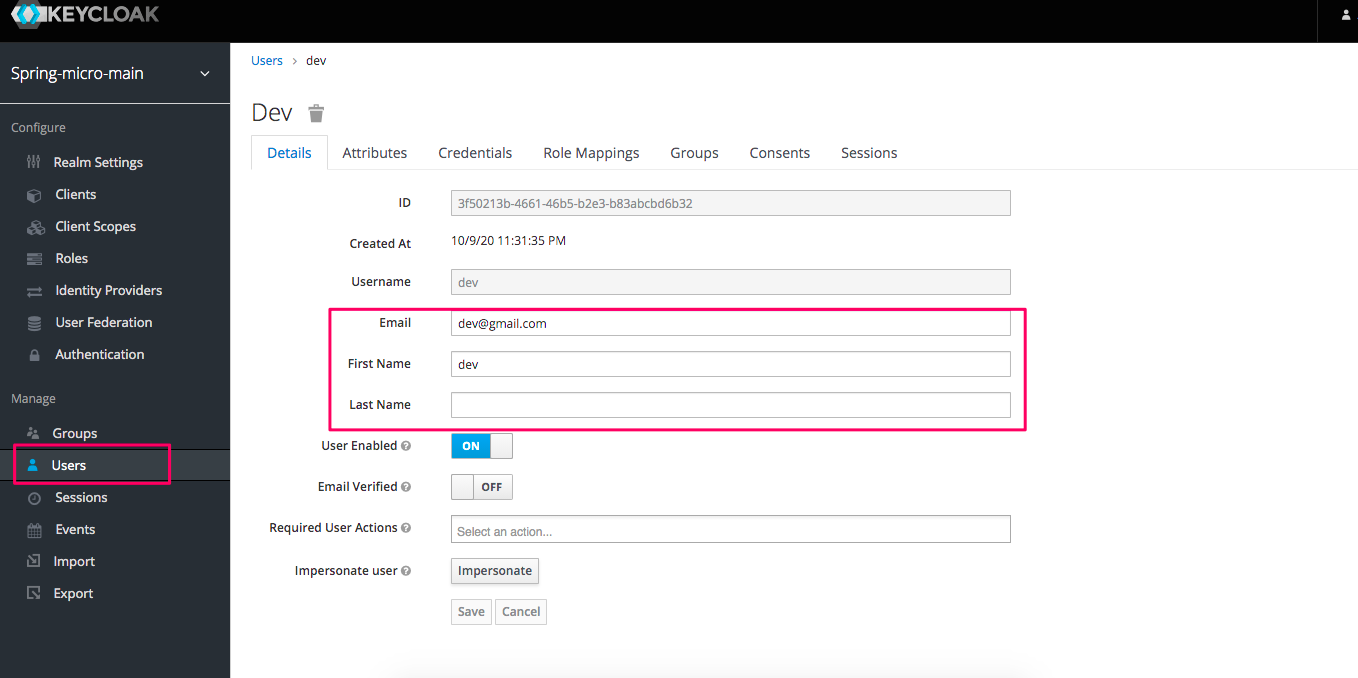
1.3 Create a user
As shown in the screenshot below, we need fill some necessary fields like first name, last name and email etc.
2. Eureka Sever - Service registration
It's quite straight forward to build a service registration server based on Spring Cloud Eureka, and we just need annotation @EnableEurekaServer to enable that.
3. API Gateway
Spring framework 5 releases Spring Cloud gateway to replace previous gateway - Spring Cloud Zuul. Spring Cloud gateway is a new generation non blocking gateway built on top of Project Reactor, Spring WebFlux, and Spring Boot 2.0, while Zuul is a blocking gateway. So, in this post, I use Spring Cloud Gateway as an api gateway for the micro services.
First of all, I need to show the application.yml configuration profile.
3.1 Route definition in Spring Cloud Gateway
We defined two routes for two micro services: consumer and producer. The lb://microservice-consumer means it points to microservice-consumer based on service registration server - Eureka. We use TokenRelay so that the access_token from the request can be passed through to micro service resource server which is secured by Spring Security OAuth2 along with Keycloak as well.
3.2 Eureka client configuration
The API gateway also acts as a Eureka client so that it can work with micro service replicas. We just need an annotation @EnableEurekaClient and configure eureka server url in the properties.
3.3 Spring Security OAuth2 and the integration with Keycloak server.
3.3.1 Spring Security OAuth2
One of the key features of Spring Security 5 is the native support for OAuth2 and OIDC, instead of the legacy client support in the old Spring Security OAuth sub project, integrating with IAM(Identity and Access Management) providers gets super easy. We need to add the following dependencies:
3.3.2 OAuth2 client registration
The properties for OAuth 2 clients are prefixed with spring.security.oauth2.client.registration andspring.security.oauth2.client.provider. For Keycloak specifically, we have to configure the details of the OAuth2 provider, and provides the details of client registration as below.
3.3.3 Spring Security OAuth2 resource server
Keycloak uses a public/private key pair to issue and verify the JWT(JSON Web Token). In particular, it uses private key to sign the access token, and the OAuth2 client uses public key to verify the token.
We need to protect the API gateway as an OAuth2 resource server so that when a request coming in with a bearer token under the Authorization header, it can also verify the token rather than redirect to SSO server for authentication, then the request can eventually go to downstream micro services. For example, we can use a http client to issue a request as below.
3.3.4 Enable OAuth2 login and resource server
In order to enable Spring Security OAuth2 login as well as resource server, we need leverage DSL methods.
Spring Security’s OAuth 2.0 Login support is enabled via the Spring Security oauth2Login() DSL method.
Spring Security’s Resource Server support is enabled via the Spring Security oauth2ResourceServer DSL method.
Illustrated as below:
4. Micro services
Micro services should be protected by Keycloak and enabled as OAuth2 resource server as well. So the configuration is similar to the API gateway. One key difference is that Spring Cloud gateway is built on top of Spring WebFlux while our micro services are built on top of Spring MVC. So the security configuration has a slight difference, illustrated as below.
That's it and you are good to go. Please check the source code from my Github.
While importing the realm-export.json in keycloak I get 'an 'Unexpected Error" message. What's the error? Can you look?
ReplyDeleteHi Kunkka, Can you let me know whether this example redirects the clients to Keycloak login page when the client hits one of the microservice via the CloudGateway? I'm looking for an example of app to app communication for microservice. So the gateway and services should verify the bearer token by calling any of the keycloak APIs.
ReplyDeleteFor sure once API Gateway as well as micro services are protected by Keycloak, token verification will fail and will redirect to Keycloak server.
DeleteThis comment has been removed by the author.
DeleteOne more question. Here I have registered my services and gateway as clients in Keycloak. I generate the token using the gateway client. With the same token I can access the services directly without the need to go through gateway. Is there anyway I can restrict the direct access to the microservices and allow traffic only via gateway?
DeleteYou can only export 80 and 443 port which are used by gateway so that outside traffic cannot reach your internal services.
Delete2021-05-09 17:54:27.422 ERROR 1 --- [or-http-epoll-4] a.w.r.e.AbstractErrorWebExceptionHandler : [4d469354-1] 500 Server Error for HTTP GET "/api/produce/"
ReplyDeletejava.lang.IllegalStateException: Could not obtain the keys
at org.springframework.security.oauth2.jwt.NimbusReactiveJwtDecoder$JwkSetUriReactiveJwtDecoderBuilder.lambda$null$1(NimbusReactiveJwtDecoder.java:345) ~[spring-security-oauth2-jose-5.3.4.RELEASE.jar!/:5.3.4.RELEASE]
Suppressed: reactor.core.publisher.FluxOnAssembly$OnAssemblyException:
Error has been observed at the following site(s):
|_ checkpoint ⇢ org.springframework.security.config.web.server.ServerHttpSecurity$OAuth2ResourceServerSpec$BearerTokenAuthenticationWebFilter [DefaultWebFilterChain]
|_ checkpoint ⇢ org.springframework.security.oauth2.client.web.server.authentication.OAuth2LoginAuthenticationWebFilter [DefaultWebFilterChain]
|_ checkpoint ⇢ org.springframework.security.oauth2.client.web.server.OAuth2AuthorizationRequestRedirectWebFilter [DefaultWebFilterChain]
|_ checkpoint ⇢ org.springframework.security.web.server.context.ReactorContextWebFilter [DefaultWebFilterChain]
|_ checkpoint ⇢ org.springframework.security.web.server.csrf.CsrfWebFilter [DefaultWebFilterChain]
|_ checkpoint ⇢ org.springframework.security.web.server.header.HttpHeaderWriterWebFilter [DefaultWebFilterChain]
|_ checkpoint ⇢ org.springframework.security.config.web.server.ServerHttpSecurity$ServerWebExchangeReactorContextWebFilter [DefaultWebFilterChain]
|_ checkpoint ⇢ org.springframework.security.web.server.WebFilterChainProxy [DefaultWebFilterChain]
|_ checkpoint ⇢ org.springframework.boot.actuate.metrics.web.reactive.server.MetricsWebFilter [DefaultWebFilterChain]
This exception means your JWT public key is not accessible by the OAuth2 client. Please login keycloak web portal to check the public key. Also please check the following uri is working after you start key cloak server.
Deletejwk-set-uri: ${keycloak-client.server-url}/realms/${keycloak-client.realm}/protocol/openid-connect/certs
http://localhost:18080/local/realms/spring-micro-main/protocol/openid-connect/certs
Delete404 Not Found
I get a successful response after changing 10.0.0.17 to my host ip
I am getting duplicate bean error (TokenRelay defined multiple time one in oauth2-client and another in cloud security) using spring boot 2.5.2 and spring cloud 2020.0.3
ReplyDeleteThis comment has been removed by a blog administrator.
ReplyDeleteThis comment has been removed by a blog administrator.
ReplyDelete